I can see many uses for it: ornament, pincushion, cushion, ornament, "pendurico", etc.
You can customize the size you want by enlarging/reducing the template.
Free pattern: The pattern was originally published in a Japanese book (don't know which) but I found it HERE (Japanese Folded Owl).
.....
TUTORIAL - How To Make:
1. Enlarge or shrink the template according to the size you want the owl.
(Template A is the body of the owl and Template B is the belly.)
| (click on the picture to enlarge) |
2. Cut out pattern using 2 different fabrics.
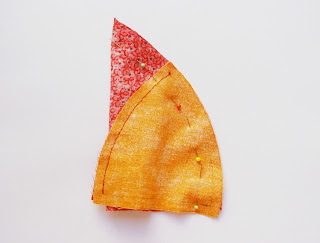
3. Lay Template B (belly) over Template A (body), right sides facing each other, and sew the side of the smaller piece.
4. Fold the big triangle, pin and sew the other side of the small triangle all the way up to the top of Template A (big triangle).
5. Turn the owl inside out.
6. Put a pin at the top of the belly - just above the small triangle. Then stuff it well.
The more you stuff the cuter the owl will come out!
NOTE: Stuffing should not fill the area delimited by the pin – that is the owl’s beak and will be folded over the belly.
8. Pull thread to close the owl. Tie firmly in a knot.
(You can also add a beak made of a triangle of yellow or orange felt or embroider a beak.)


Além de fofo dá muuuuuita sorte.
ReplyDeletebjos
fantàstico, me lo llevo me encantan las lechucitas. gracias
ReplyDeleteThank you this is very cute.
ReplyDeletegracias por todo, pero tendrian que pnerle un trductor a otro idioma.
ReplyDeleteThank you this is very cute.
Google tiene un traductor. Pero, puedes te guiar por las fotos. Gracias.
DeleteThis is adorable. Thank you so much for sharing with us.
ReplyDeleteThank you for sharing. Love it!
ReplyDeleteI just made one from your instructions. Love it. He will be my good luck sewing charm for 2014.
ReplyDeleteJust made one tonight. Love it. He will be my good luck sewing charm for 2014. Thank you. and Happy New Year.
ReplyDeletesooooo sweet! must make me some...they're gorgeous!!! thanks so much for the tute!!!!!
ReplyDeleteSugary hugs
Wendy ;o)
So cute! And so easy! Thank you!
ReplyDeleteLOVE LOVE LOVE this adorable little owl! I'll be making several these next few days; great way to use up scraps, too! Thanks for sharing!!!
ReplyDeleteThank you for this cute little owl tutorial. I will be trying it as a pincushion.
ReplyDeleteFor some reason the instructions are not reading right. I'm trying to do a pincushion it's not coming out right. I put the fabric facing each other but it don't wk right 2 of us have tryed it and we need help. Thank you
ReplyDeleteOK. After you sew one side of the small triangle onto the big triangle, you then have to sew the other side: starting at the base of the small triangle, sew all the way up to the top of the big one (you'll be sewing the two sides of the big triangle and turning it into a "cone").
DeleteTurn the "cone" inside out.
so cute! tanks!
ReplyDeletezo snoezig, dank u wel!
ReplyDelete