April 14, 2011

Laurel Beret

Another gorgeous pattern by Jared Flood: Laurel


YARN: Cascade 220 (received from jbarlow - Color Swap 9) - Dark plum (8885)
NEEDLES: US 7 / 4.5mm
               US 1.5 / 2.5mm (ribbing)

(Peta Maga modeling)
Started:   April 11, 2011
Finished: April 14, 2011


Notes:
  • Cast on 120 sts with US 1.5/3mm circular needle.
  • 2x2 ribbing for 9 rnds.
  • Changed to US 7/4.5mm circular needles.

BOBBLE:
K4fb, turn, P4, turn, K2, K2tog, pass those two stitches one by one over the K2tog.


ADDING LENGTH:
If you want a longer hat repeat rnds 15 - 25 - 35.
(I did that but then decided to rip off and just followed the pattern.)

- make rnd 15, repeat rnd 15 and change marker placement as instructed.
- make rnd 25, repeat rnd 25 and change marker placement as instructed.
- make rnd 35, repeat rnd 35 and change marker placement as instructed.


April 08, 2011

Wicked cats

This is what my wicked cats do to my sofa and armchairs....


March 25, 2011

Folded Owl

This is a great sewing origami!!!
I can see many uses for it: ornament, pincushion, cushion, ornament, "pendurico", etc.


You can customize the size you want by enlarging/reducing the template.

Free pattern: The pattern was originally published in a Japanese book (don't know which) but I found it HERE (Japanese Folded Owl).

.....

TUTORIAL - How To Make:

1. Enlarge or shrink the template according to the size you want the owl.
   (Template A is the body of the owl and Template B is the belly.)

(click on the picture to enlarge)

2. Cut out pattern using 2 different fabrics.


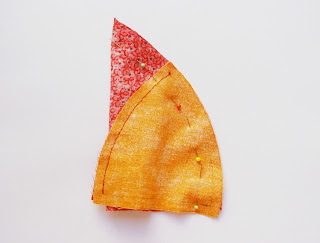
3. Lay Template B (belly) over Template A (body), right sides facing each other, and sew the side of the smaller piece.


4. Fold the big triangle, pin and sew the other side of the small triangle all the way up to the top of Template A (big triangle).


5. Turn the owl inside out.


6. Put a pin at the top of the belly - just above the small triangle. Then stuff it well.
The more you stuff the cuter the owl will come out!
 
NOTE: Stuffing should not fill the area delimited by the pin – that is the owl’s beak and will be folded over the belly.


7. Make a seam at the bottom of what now looks like a "cone"! Tack with big stitches the bottom of the body and stuff some more.


8. Pull thread to close the owl. Tie firmly in a knot.


9. Remove pin and fold the top triangle. Sew the tip of the beak to the owl’s belly.


10. Sew the eyes - you can use buttons, felt circles, beads, safety eyes, etc.
(You can also add a beak made of a triangle of yellow or orange felt or embroider a beak.)


March 24, 2011

Little cute owl

This owl pattern is so simple yet so cute.
Free pattern: Owlets


YARN: Sedificada (Pingouin) - deep red
           Cristal (Pingouin) - beige
Hook: 4 mm (body)
          2.5 mm (beak)


The button eyes were "inspired" by Julie (Juleeque - Ravelry). :-)

March 23, 2011

Waterhouse Mitts

This is a test knit for pmcblonde - Ravelry.


YARN: Keamor (Pingouin) - beige and white
NEEDLE: US 2 - 2.75 mm (circular)

I'm having the chance to use my lovely tiny winny HiyaHiya bamboo circular needle for the first time!
It's a US #2 / 2.75 mm needle, just 9" / 23 cm long.

March 21, 2011

Cotton cloths

I made these spa cloths for a Ravelry friend - Spring Swap (MOHS)

Chinese Waves Dishcloth
CO 49 sts.
Cast-on and bind-off with size
7 needle.
Pattern worked with size 8 needle.


Cast-on and bind-off with size 7 needle.
Pattern worked with size 8 needle.


YARN: Barbante Esmeralda (São João) - 100% cotton yarn - 8/10
NEEDLES: US 7 - 4.5 mm and US 8 - 5.0 mm


March 16, 2011

Blades of Grass Fingerless Mitts

This was a test knit for katili (Katie Wagner) - Ravelry (always Ralvery!)
Pattern available: Blades of Grass


I just love these mitts!!! They are so neat and elegant.
My Ravelry project page.
The original pattern was fingerless but with Katie's concent I added a thumb gusset.


YARN:
NEEDLES:

March 06, 2011

Carnaval 2011

Street party at Rua Sofia Veloso (Cidade Baixa) - Porto Alegre - RS.


February 21, 2011

Terra Shawl

This is a beautiful shawl designed by Jared Flood.
Pattern: Terra Shawl


NEEDLE: US 10 / 6 mm
YARN: Malabrigo Merino Worsted (Azul Profundo) - 210 yds

  • This shawl is knitted topdown (starts at center back and works down to the bottom edge)
  • When doing the Provisional Cast-On make sure a long tail is left for grafting the 12 stitches later on.
  • GARTER RIDGE PATTERN should be repeated 10 times. (total of stitches = 224)
  • After finishing Garter Ridge Pattern (or even before) go back to provisional cast-on and graft the stitches (using Kitchener Stitch), this way when you finish Chart B you’re done!!!
  • The 3 knit stitches edge on each side will become the hypotenuse (top) of the triangle and is done throughout the whole pattern (Garter Ridge, Chart A and Chart B).
  • The center stitch marker is the bottom tip of the shawl!

(click to enlarge)


  • DIMENSIONS:
    Before blocking: 55” (140cm) (wingspan) x 27” (68.5cm)
    After blocking:

  • Ãfffff.... I had to frog the grafting 2 times! To make it perfect I've decided to graft purlwise the first 3 stitches then graft knitwise the last 3.


..........

I wanted the shawl wider so I decided to add a 4th repeat to Chart A. So I had to “extend” Chart A and alter Chart B since I had already knit up to 3rd repeat of chart A and didn't want to frog all the work done.


But if you want a larger shawl a much easier way is to increase Chart A.
IF YOU WANT A LARGER SHAWL:

Increase Garter Ridge Pattern by multiples of 22 to be able to follow Chart A later on (11 sts = one pattern repeat, so you need to increase that on both sides/halves --> 11 sts on one half of the shawl, 11 sts on the other half).

According to pattern, when you finish the Garter Ridge Pattern you should have 224 sts; if you increase it x1 you’ll have 246 sts, and if you increase it x2 you’ll end up with 268 sts.
..........
 
Yarn: 
- Fisrt hank: knit up to Row 3 (9th repetition) of Garter Ridge Pattern.
- Second hank: started 2nd hank on 22nd row of Chart A.
- Third hank: started 3rd hank on 2nd pattern repeat of Chart B and knit up to 7th row of edge pattern.
- Fourth hank: just used a little bit to finish the last 3 and a half rows! (if you don’t increase the pattern 3 hanks will work just fine)


(Chart A - 4 repeats)

(unblocked)

_____________________________________________________________________________________

B-O OPTIONS:
- Elastic Bind-Off: k1, *k1, slip 2 sts back to left needle and k2tog tbl*.
- K2tog tbl, slip stitch back to left needle.
  (k2tog tbl = knit 2 together through the back loops).
- BO with a needle 2 sizes larger.